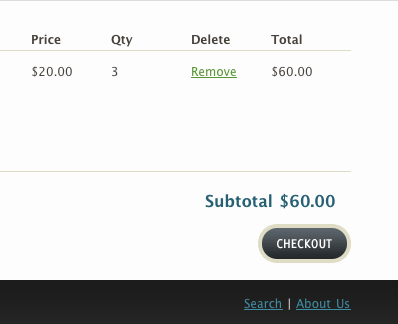
Now that we've covered what needed to be done on product pages, we will move our attention to the cart page.
Once our visitor lands on the cart page, we will read his web cookie and accomplish, at least, two things:
We will need to make room on the cart page to display the chosen attributes for each cart item.
The way Shopify organizes the shopping cart is by product variant. Each row in the cart table provides information about cart items (plural or singular) that are of the same product variant garden variety. In other words, a LineItem (as Shopify calls it) is a subset of the cart, and contains information about items that have the same SKU. In our case, we can further differentiate between the items that are part of the LineItem, because some items in there may have different attributes (different color, and different material).
We will now add a new column to the cart table. For this, we will need to add HTML elements to our cart.liquid template, one HTML element to add a header for the column, and an other to add the LineItem cell for that new column. Open your cart.liquid template and locate your HTML table element.
We will add a column between the Description and Price columns and name it Items.
...
<th>Description</th>
<th>Items</th>
<th>Price</th>
...
Then we will add a td element between the Description and Price cells and fill it with a paragraph, that, in turns, will contain a form input of type hidden.
<td class="basket-column-one">
...
</td>
<td class="basket-column basket-column-two">
<p id="{{ item.variant.id }}">
  <input type="hidden"
  name="attributes[{{ item.product.handle }}-{{ item.variant.title | handleize }}]"
  value="" />
</p>
</td>
<td class="basket-column">
...
</td>
The class name basket-column-two will help us with CSS styling later on — we're also using the default class name basket-column.
Let's examine the content of that data cell.
<td class="basket-column basket-column-two">
<p id="{{ item.variant.id }}">
  <input type="hidden"
  name="attributes[{{ item.product.handle }}-{{ item.variant.title | handleize }}]"
  value="" />
</p>
</td>
We are sending with our checkout form extra fields named attributes[SOME_LINE_ITEM_IDENTIFIER]. The square brackets mean that we're sending an array. Indeed, each LineItem will have its own input element with name attributes[SOME_LINE_ITEM_IDENTIFIER]. The identifier must inform us, the buyer, about the LineItem, what it is. The LineItem ID (line_item.id) is just a number and not very telling for us. So I have chosen here to send an identifier that includes both the product handle and the variant title (turned into a handle, handleized). The combination will be unique, of course, as it is unique for each LineItem. The value associated with each field will tell us in the transaction slip about the attributes of all cart items that belong to that product variant. The name attributes has not been picked arbitrarily. We have to name these input fields attributes.
Time to write some JavaScript code. Reading the cookie and parsing it should be familiar to you by now. Open your theme.liquid template and add a Liquid wrapper between your script tags.
{% if template == 'cart' and cart.item_count > 0 %}
// If we are on the cart page and the cart is not empty.
{% endif %}
Our JavaScript code will be sent to the browser and parsed by it only for the cart page, and when the cart is not empty.
The code now.
{% if template == 'cart' and cart.item_count > 0 %}
// If we are on the cart page and the cart is not empty.
// When the DOM is ready.
jQuery(function() {
  // Reading the attributes from the cookie for display.
  var myJSON = jQuery.cookie('shopify_cart_attributes');
  var items = jQuery.evalJSON(myJSON);
  // Iterating through the cart items.
  for (var i=0; i<items.length; i++) {
    var attribute = 'Material: ' + items[i].material + ', Color: ' + items[i].color;
    // Creating a span element and filling it up.
    var item = jQuery('<span></span>').text(attribute).attr('id', items[i].unique_id);
    // Appending the span element to the DOM.
    jQuery('#' + items[i].variant_id).append(item).append('<br />');
  }
});
{% endif %}
And we're done with at least displaying the attributes for each cart item on the cart page. We will add to this code later on. For example, we will add a 'remove' link next to each cart item set of attributes, so that a cart item with specific attributes can be removed from the cart — as opposed to removing all cart items that belong to the same product variant.
The DOM manipulation in the last snippet of code is a little complex. In a nutshell, for each cart item, we are creating a brand-spanking new span element, and filling it up with the attributes description, read from the cookie. We are giving an id to that span, and it is the unique id we had computed earlier on for the cart item in the cookie. Then we're looking for the LineItem paragraph element that corresponds to the variant ID of our cart item and append our new span element to it. The br element is added so that each set of attributes appears on its own separate line. For readability, in other words.
Something doesn't make sense here: a user can update the number of cart items of the same product variant. How can we keep track of the attributes of the cart item that is deleted or added this way? That is crazy talk. So we'll remove the ability for the shopper to change the LineItem quantities. We will keep that field, as Shopify requires it, but we will change its type from text to hidden. Changing a form field's type from text to hidden removes the ability for the user to edit it. We could simply disable the text field, but the user would wander why he's not able to edit it (what is going on, here, will he think, what have I done wrong?).
Open you cart.liquid template and look for this HTML:
<td class="basket-column"><input type="text" size="4" name="updates[{{item.variant.id}}]" id="updates_{{ item.variant.id }}" value="{{ item.quantity }}" onfocus="this.select();"/></td>Edit it to:
<td class="basket-column"><input type="hidden" name="updates[{{item.variant.id}}]" id="updates_{{ item.variant.id }}" value="{{ item.quantity }}" />{{ item.quantity }}</td>We will also hide the Update button, using CSS. Speaking of CSS, we will also style our attributes sets in the table.
#basket td.basket-column-one .basket-images {
  margin-left: 0;
}

#basket td.basket-column-one .basket-desc {
  width: inherit;
}

#basket td.basket-column-two {
  width: 34em;
}

#update-cart {
  display: none;
}

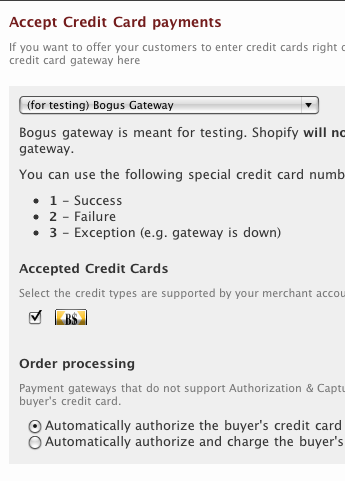
While we implement this part, we need to test it using a Bogus Gateway. Shopify provides one. You can set it up on your admin/preferences/payment page. The instructions on how to setup the Bogus Gateway would push this tutorial length over the edge.
But the following screen capture should provide a strong hint:

Open you theme.liquid template. Time to amend our cart JavaScript code.
{% if template == 'cart' and cart.item_count > 0 %}
// If we are on the cart page and the cart is not empty.
jQuery(function() {
  // If the DOM is ready.
  // Reading the attributes from the cookie for display AND submission.
  var myJSON = jQuery.cookie('shopify_cart_attributes');
  var items = jQuery.evalJSON(myJSON);
  // Re-setting the value of our hidden attributes[] fields to empty strings.
  jQuery('td.basket-column-two input[type=hidden]').val('');
  // Iterating through the cart items.
  for (var i=0; i<items.length; i++) {
    var var_id = items[i].variant_id;
    var attribute = 'Material: ' + items[i].material + ', Color: ' + items[i].color;
    var item = jQuery('<span></span>').text(attribute).attr('id', items[i].unique_id);
    jQuery('#'+ var_id).append(item).append('<br />');
    // Updating our attributes[] fields.
    attribute = jQuery('#'+ var_id +' input').val() +' ['+ attribute +']';
    jQuery('#'+ var_id +' input').val(attribute);
  }
});
{% endif %}
We added some JavaScript code to the for loop that iterates through the parsed cookie. Not only are we displaying the attributes of our cart item in the cart table, but we are now appending the attributes info to the corresponding LineItem hidden attributes[] field. We're surrounding the attributes set with brackets:
attribute = jQuery('#'+ items[i].variant_id +' input').val() +' ['+ attribute +']';
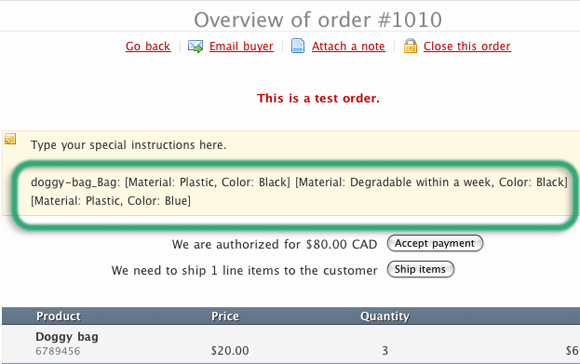
We could have used parenthesis, or whatever your whims dictate in this situation. The attributes[] value is for your eyes only. The value will be displayed on the order detail page in your admin area. And you need a bogus gateway to see it, to make sure that it does appear there.
In jQuery, depending on how it's used, val() is either a getter or a setter function. If we call it with a parameter, we are setting the value of a form field. If we call it like this: val(), without a parameter, we are reading the value of a form field. You will notice in the above code that we're reading the value of the attributes[] field, storing it, appending to it and rewriting the field's former value with an updated one. We do this because that field may contain information about more than one cart item. We do not want to overwrite the field's value but add to it, while we iterate through our parsed cookie.
// Updating our attributes[] fields.
attribute = jQuery('#'+ var_id +' input').val() +' ['+ attribute +']';
jQuery('#'+ var_id +' input').val(attribute);
If you have trouble reading the above code, read it broken down like so:
// Updating our attributes[] fields.
var oldAttribute = jQuery('#'+ var_id +' input').val();
var newAttribute = oldAttribute +' ['+ attribute +']';
attribute = newAttribute;
jQuery('#'+ var_id +' input').val(attribute);
And since some browsers memorize the values of form fields, we need to re-set our form fields to empty strings whenever a user lands on the cart page — before we iterate through the parsed cookie.
// Re-setting the value of our hidden attributes[] fields to empty strings.
jQuery('td.basket-column-two input[type=hidden]').val('');
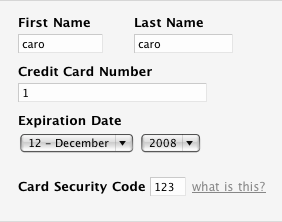
Go through the checkout process. Add a few items to your cart. On the checkout page, use '1' as credit card number, and '123' as card NIP. Do not forget to change the expiration month, which defaults to January of this year.

You can also abandon the order half way, after filling up page 1. You will be able to read the attributes in your abandoned order slip.

Shopify deletes its own cart cookie when a transaction is completed. A transaction that is abandoned during the checkout process is not a completed transaction. If you go through a transaction yourself, as a buyer, using the Bogus Gateway, and you do not go through the process till the end, that is, until your bogus credit card is charged, then your cart will not be emptied upon your return in the shop. If you do go through the process, the transaction is marked completed and the cart is emptied.
How do we keep track of this ourselves? There is a very simple trick, a quite clever one, I am quite pleased to have come up with it on my own (like everything else here, for the matter). Ok... I am bragging. So what's the trick? Shopify, in its glorious magnanimity, always keeps its cart.item_count variable up to date. When a transaction is completed, Shopify deletes its cart cookie and resets the cart item count to zero. The trick involves adding these fews lines of code to your JavaScript, in theme.liquid:
{% if template == 'cart' and cart.item_count == 0 %}
// Deleting our cookie.
var configuration = {expires: 14, path: '/', domain: '{{ shop.domain }}'};
jQuery.cookie('shopify_cart_attributes', null, configuration);
{% endif %}
Using this trick, we will no doubt delete the cookie even when it doesn't exist. We will attempt to delete a non-existing cookie. But no harm will be done, no error thrown at us, if we do so. We could check if the cookie exists, but it is not necessary, it would be verbose and just add lines of code, and I love minimalism.
The Vogue theme provides a handy Remove link for each LineItem in the cart table. This works for us. However, there is a small problem. We need to update our cookie when a bunch of items are removed from the cart in this fashion. We will amend the Vogue's theme JavaScript to keep our cookie in sync.
Open your cart.liquid template and locate the definition of the remove_item function. The original function is defined like so:
function remove_item(id) {
   document.getElementById('updates_'+id).value = 0;
   document.getElementById('cartform').submit();
}
The function receives as parameter some id, and uses it to set the LineItem Qty to zero. What id is this? The following HTML snippet taken from the cart template should provide a strong hint:
id="updates_{{ item.variant.id }}"So, the id is the variant ID. Let's use it to update our cookie.
function remove_item(id) {
  document.getElementById('updates_'+id).value = 0;
  // Adding our own code here -- BEGIN
  var myJSON = jQuery.cookie('shopify_cart_attributes');
  var items = jQuery.evalJSON(myJSON);
  for (var i=0; i<items.length; i++) {
    if (items[i].variant_id == id) {
      items.splice(i, 1);
      i--;
    }
  }
  var configuration = {expires: 14, path: '/', domain: '{{ shop.domain }}'};
  jQuery.cookie('shopify_cart_attributes',
    jQuery.toJSON(items),
    configuration);
  // -- END
  document.getElementById('cartform').submit();
}
In JavaScript, using splice() is the way to go to remove an item from an array when that item may not be located at the beginning or end of the array. When we do remove an item, we have to decrement our iterator, otherwise we will skip an item.
for (var i=0; i<items.length; i++) {
  if (items[i].variant_id == id) {
    items.splice(i, 1);
    i--; // decrementing our iterator.
  }
}
Comments
Items do not show. Remove link does not work.
Hi,
The "Items" do not display the material and color of the bag. The column is empty.
The "Remove" link does not work. Also, only one "Remove" link displays if multiple items of the same SKU is added to the cart.
I am sorry, I cannot help you, Ann.
The example online works very well and uses the code from the tutorial. I cannot help you because I cannot look at your code.
Referring to http://11heavens.myshopify.com/cart
I was looking at the online store that you built in the tutorial. I added the same bag with different materials and color to the cart. While in the cart page, I tried removing an item by clicking on "Remove" but no item was deleted. Also, the variable in the Items column do not show up. There is only one "Remove" link for multiple quantities of the same product.
http://11heavens.myshopify.com/cart
Clear your cookies
Clear all your path cookies.
Also please uncomment the console.log that prints the content of the cookie and let me know what the cookie contains, using Firebug.
Ah I see what the problem is...
I had left a few console.log instructions in my code. That will cause problems in IE. Were you in IE...?
Let me know if it works now. Use the updated code.
Cheers,
The way Shopify organizes
The way Shopify organizes the shopping cart is by product variant. Each row in the cart table provides information about cart items (plural or singular) that are of the same product variant garden variety. In other words, a LineItem (as Shopify calls it) is a subset of the cart, and contains information about items that have the same SKU. In our case, we can further differentiate between the items that are part of the LineItem, because some items in there may have different attributes (different color, and different material).
e-papierosy
http://e-papierossy.com.pl/en/e-papierosy/61-e-papierosy-gombit-5353h.html
http://e-papierossy.com.pl/en/e-papierosy/65-e-papierosy-gombit-543567.html
Yay!
Hi Caroline,
It works now. Both in IE7 and Firefox.
Thanks so much!
ahah I got an e-mail from Shopify
Shipping address:
Ann ...
2x Doggy bag (sku: 6789456)
doggy-bag_Bag[Material: Plastic, Color: Yellow] [Material: Plastic, Color: Black]
Cart testing
That is me testing the cart :)
Jquery example() function breaking code
Great tutorial!
For future users attempting this tutorial, your last output of jQuery has the following line:
jQuery('#note').example('Type your special instructions here.');A simple switch to the following made everything work perfectly for me.
jQuery('#note').val('Type your special instructions here.');Other than that, everything went as smooth as ever. Great work.
I am using the example jquery plugin
I am using the jquery plugin that's here. Did I really copy and paste the code from the test site with that line? It should be removed. Using the example plugin is just fluff, not relevant to the task. I'm sorry.
Do not use this line:
jQuery('#note').val('Type your special instructions here.');I got rid of the line
I fixed the tutorial. Thanks Aaron.
First off, thank you so much
First off, thank you so much for this, it has been such a huge help for me.
I had a question in regards to this method. Is there a way I can do this when there is more than one variant? I working on a wine club page in which one product has a 2 bottle and a 6 bottle variation, each one costs differently. But on the product page, I have different questions to ask the customer, that I need to appear in my order page in the admin. (example: is this a gift? (yes/no), shipping address is (residential/business), etc.) So far I can get it to work with one variation, but that {% assign variant = product.variants.first %} code of course doesn't all me to have other variations.
Any help with this would be appreciated. Thank you.
Hi Darion,
I answered your question in the Shopify forums.
Here it is:
That’s a change made to the Vogue theme. Don’t make that change if you also want Shopify Variants.
You will also need to edit that part of the JavaScript that writes to the web cookie. The variant ID must be read from the form (as opposed to picking up the first variant ID), and then stored to the cookie with the other values.
Good luck.
If you need further assistance or customization of this code, contact me.
Can I post different prices in products variants
Can I post different prices in products variants
Ex: Plastic & Blue is $20
Degradable within a week & yellow is $50
No you can't.
No you can't.
really very good post.
I should say I am certainly impressed with your weblog and posts.
http://twinfountainsec-woodlands.com
cart page requires a lot of attention and effort. Hedges Park Condo, Topiary EC, Twin Fountains Woodlands