
The following exercise consists in moving pieces of code around, code that I did not write myself. Credit for the code goes to Joakim Stai (nicknamed 'ximo' on Drupal.org), the maintainer of the excellent Node form layouts module, as well as to the Usability group.
This exercise is all about gaining experience in:
Download and extract the module Node form layouts from its project page on Drupal.org.
Install the module after you've read the instructions in the README.txt file. Don't forget to modify the template.php file of the Garland theme, as instructed. This module will serve us as guide. When done with this exercise we will disable it, uninstall it and delete all traces of it.
Go to myWebSite.com/admin/content/node-settings.
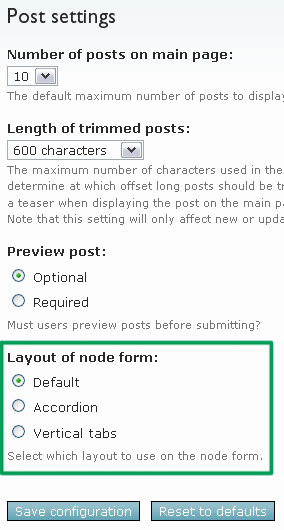
What we see in the green rectangle overlaid on the screen capture has been added by the Node form layouts module. We would like to see this field not on the node settings page, but rather on the theme configuration page at myWebSite.com/admin/build/themes/settings/myTheme.
Open your text editor. To make it easier for us, we will modify the Garland theme. Steps 3 to 5 describe how to add a layout setting to your theme configuration page.
If your theme does not already have a theme-settings.php file, create one and save it to your theme folder. In it, copy the following function skeleton:
<?php
/**
* Implementation of THEMEHOOK_settings() function.
*
* @param $saved_settings
*   array An array of saved settings for this theme.
* @return
*   array A form array.
*/
function phptemplate_settings($saved_settings) {
  // Return the additional form widgets
  return $form;
}
?>
If a user has previously saved the theme settings, these saved values are passed to the function in the $saved_settings parameter.
The fields to add to the theme setting form, that is, the 'widgets', need to be returned as a Form API array here. Let's add a widget right now.
Browse to your nodeform module folder, which you'll find under sites/all/modules. Open the nodeform.module file in your text editor. The Form API array definition for the layout widget is defined within the function nodeform_form_alter(&$form, $form_state, $form_id).
The Form ID of the node settings form in Drupal 6 is node_configure. So, look for the addition made to the node settings form based on its Form ID node_configure. Found it? Copy and paste the $form['nodeform_layout'] array definition to your theme-settings.php file, like so:
<?php
function phptemplate_settings($saved_settings) {
  // Return the additional form widgets
  // Beginning of my COPY & PASTE
  $form['nodeform_layout'] = array(
    '#type' => 'radios',
    '#title' => t('Layout of node form'),
    '#default_value' => variable_get('nodeform_layout', 'default'),
    '#options' => array(
      'default' => t('Default'),
      'accordion' => t('Accordion'),
      'vertical' => t('Vertical tabs'),
    ),
    '#description' => t('Select which layout to use on the node form.'),
  );
  // End of my COPY & PASTE
  return $form;
}
?>
Browse to myWebSite.com/admin/build/themes/settings/garland, and scroll down. You'll find a new field at the bottom of the form, one with which we can specify a layout for our node form:
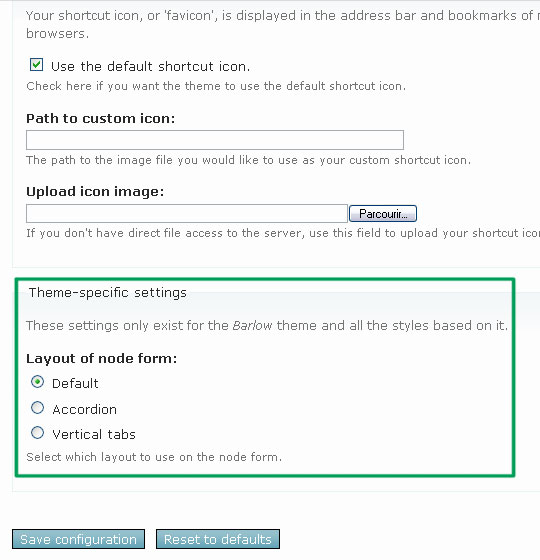
There's a problem, though: we get our default layout from reading a variable set by the nodeform nodule. That's not good for our purpose, since we intend to disable the nodeform module when we're done with this exercise. We do *not* want to use the nodeform module. We need to get our default value '#default_value' from reading the $saved_settings parameter. We'll modify our function like so — do read the /* comments */ to follow what's going on :-) →
<?php
function phptemplate_settings($saved_settings) {
  /*
   * The default value for the layout.
   */
  $defaults = array(
    'nodeform_layout' => 'default',
  );

  /*
   * Adding this setting to ALL saved settings,
   * and storing these to a new variable, $settings.
   * In the following line of code,
   * if there's already a 'nodeform_layout' key set
   * in $saved_settings,
   * this value *overwrites* the default value in $defaults.
   * If this is not clear to you,
   * look up what array_merge does on php.net.
   */
  $settings = array_merge($defaults, $saved_settings);

  // Return the additional form widgets
  $form['nodeform_layout'] = array(
    '#type' => 'radios',
    '#title' => t('Layout of node form'),
    // using the value that's been saved or the default
    '#default_value' => $settings['nodeform_layout'],
    '#options' => array(
      'default' => t('Default'),
      'accordion' => t('Accordion'),
      'vertical' => t('Vertical tabs'),
    ),
    '#description' => t('Select which layout to use on the node form.'),
  );

  return $form;
}
?>
If there's already a 'nodeform_layout' key set in $saved_settings, the value it is set to will overwrite the one in $defaults. In other words, if there is a saved setting, we use that one, and not the default. To understand how this works, look up the array_merge() definition on php.net.
The parameter $saved_settings contains all the settings that have been saved for our theme. Our default value needs to be read from these saved settings. If no value has been saved yet, we need to use some kind of default. Here, that default will be... 'default' — and not 'Default'. In the Drupal Form API, we set the default value of a radio field to one of the keys in the '#options' array, and not the value associated with that key.
Notice we use the name nodeform_layout in 3 places in the above code:
Time to test. Change the layout, for example to 'Accordion', do Save Configuration, and then scroll down to see if your choice has been saved.
We have completed the first part of our exercise which consisted in adding [a] theme [setting] to a theme configuration page
. Will this setting have any effect, though? Not yet. Getting there.
The second part of this exercise consists in theming [a form] inside a theme, as opposed to writing a module for the same purpose.
. In steps 6-8, we will theme the node form.
Before we begin, we will change our theme to the one we're working on. In my case, I am changing my default theme to 'Garland'. Then, let's open a node and click on its Edit tab, to bring about the node form. Here is how I see it, as the Administrator:
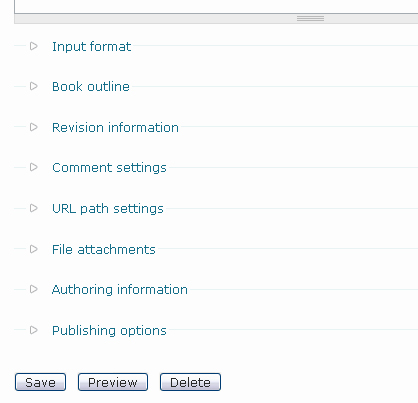
The very first question we must ask ourselves is: What is the 'Form ID' of this form? Looking through node.module, I find that the Form ID of the node form is node_form.
From the book Pro Drupal Development 1st edition (p.156): Drupal needs to have some way of uniquely identifying forms, so it can determine which form is submitted when there are multiple forms on a page and can associate forms with the functions that should process that particular form. To uniquely identify a form, we assign each form a form ID. For most forms, the ID is created by the convention 'module name' plus an identifier describing what the form does. For example, the user login form is created by the user module and has the ID user_login.
Our second question is then: Does a *.tpl.php file already exist to theme this node form? That template would be placed in the modules/node folder, and would have the name form-id.tpl.php, that is, node-form.tpl.php. (Note that the underscore in the Form ID becomes an hyphen in the template's file name). The answer to that second question is no. If the template had existed, we would have copied it to our theme folder, to modify it. Now we'll come up with a 'function theme override' instead.
We can answer the previous questions without weeding through source code. To determine what is the form ID of any form, and how to intercept and override its theming function, we can use the Theme developer module. As of Drupal 6, this new module is part of the Development package. If you have not yet downloaded the Devel set of modules, do so. Move your 'devel' folder to sites/all/modules. Enable the Devel and Theme developer modules on your myWebsite.com/admin/build/modules page. Head over to any node edit page. Enable the Themer info widget and click on the form you want to theme, in our case the node edit form. It might be difficult to select the whole form — you may end up looking at the info describing one field or an other. Try clicking in the white space to the right of your form buttons.
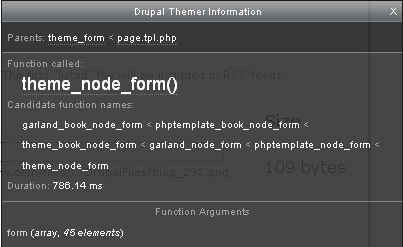
You will see a Function called in your Drupal Themer Information window, rather than a File used... so now we know that no template file was used to theme this form. The name of the theming function gives away the form ID of the form because it follows the pattern theme_form_ID. Hence, the form ID of the node edit form is node_form. We're also given under Candidate function names a list of functions names we can use to override the theming function. Because we're working with a base theme, we'll pick the name phptemplate_node_form. If you were looking at the node edit form of a 'story', you would find in the list of candidate function names phptemplate_story_node_form. Or, if you were looking at the node edit form of a 'book page' you'd find phptemplate_book_node_form. Hence, it's possible to theme the edit form for nodes of a specific content type right-out-of-the-box.
Without the Theme developer module, we can determine the form ID of a form by doing a View Source of the page that contains it. We can look for the string <form. The id given to the form is its form ID. There might be several forms on the page so make sure you've picked the correct id.
We will define a function in our theme template.php file with the following signature: phptemplate_form_id($form), that is, we'll write a function with name phptemplate_node_form($form).
Let's do this right now. Open the file template.php in your theme folder. If such file does not exist, create it. Copy the following code in your template.php file:
<?php
/*
 * Theming the node form
 */
function phptemplate_node_form($form) {
  /* We'll call the BASE function,
   * defined in modules/node/node.pages.inc
   * something we should never do, because
   * we are then overriding all... overrides.
   */
  return theme_node_form($form);
}
?>
Now, save your template.php file, and refresh your web page in your browser. How does your node form look now? Mine looks exactly the same:

Now, let's use drupal_render() instead. This function returns HTML, that is, the markup for all the fields of the form that have not been rendered yet. With the following code, what has not been rendered yet is all the fields.
<?php
/*
 * Theming the node form
 */
function phptemplate_node_form($form) {
  /* Using drupal_render()
   * is the way to go to
   * output markup
   * for a form in Drupal.
   */
  return drupal_render($form);
}
?>
Save your template.php file and refresh your web page. Now the node form does look different. The buttons are now under the Input format fieldset. That's the default order in which drupal_render() outputs the form. That's pretty ugly for the Administrator.

We can change that. We will render the buttons first, save the return value for later — we'll keep it on the side, so to speak — then call drupal_render() a second time. Remember that drupal_render() only renders what has not been rendered yet. Therefore, the return value of the 2nd call will render the entire form minus the buttons. This rest-of-the-form can be outputed before the return value of the 1st call, that is, the HTML of the buttons. Using this 'trick', we can reorder our form as we wish. Here's the code:
<?php
/*
 * Theming the node form
 */
function phptemplate_node_form($form) {
  /* The buttons must be rendered first, because
   * they need to go to the bottom of the form.
   */
  $buttons = drupal_render($form['buttons']);
  return drupal_render($form) . $buttons;
}
?>
Save your template.php file and refresh your web page. Now everything is pretty again, buttons are back at the bottom of the form.

Conversely, we can get a certain field to always appear on top of all others. Again, I will quote from the the book Pro Drupal Development 1st edition, p.160: We could quickly make a certain element appear first in the form, as in the following code, where we put the color fieldset at the top:
<?php
function phptemplate_nameform($form) {
  // Always put the the color selection at the top.
  $output = drupal_render($form['color']);
  // Then add the rest of the form.
  $output .= drupal_render($form);
  return $output;
}
?>
Now that we 'get' how to create theme override for forms, we'll try and mimic what the Node form layouts module is doing to the node form. The module has a handle on the node form through its use of the hook_node_form_alter function. We've already taken a look at this function in step 4. Let's go back to it now.
Browse to your nodeform module folder, which you'll find under sites/all/modules. Open the nodeform.module file in your text editor. In the function nodeform_form_alter(&$form, $form_state, $form_id), look at what's done to the node form. Interestingly enough, we access this particular form through its CSS id, rather than its Form ID. Why? I have no clue as to why.
Instead of this:
<?php
elseif ($form['#id'] == 'node-form') {
?>
I would have expected that:
<?php
elseif ($form_id == 'node_form') {
?>
Never mind for now. Let's look at what's done here. First, we get the path to the module folder, like so:
<?php
$module_path = drupal_get_path('module', 'nodeform');
?>
The module gets this path to add dynamic linking to CSS and javascript files later on. In our case, we better get the path to our theme folder instead, where we'll copy the stylesheets and scripts. We do NOT want to use the module when we're done with this exercise. (Although, of course, by and large we have copied our code from it.)
Moving on with our examination of the nodeform.module file, we see the following lines of code:
<?php
$form['buttons']['#prefix'] .= '<div id="nodeform-buttons">';
$form['buttons']['#suffix'] .= '</div>';
?>
We can certainly wrap our buttons in a div with a CSS id in the same way.
The lines of code that follow are all about dynamically linking to stylesheets and scripts when the node form is displayed.
Let's go back to our template.php file and get to work on it right now.
<?php
/*
 * Theming the node form
 */
function phptemplate_node_form($form) {
  /* We get the path to our theme,
   * and NOT to our module. We want to
   * do without this module.
   */
  $theme_path = path_to_theme();

  // We add a CSS id to the buttons, *in the same way*
  $form['buttons']['#prefix'] .= '<div id="nodeform-buttons">';
  $form['buttons']['#suffix'] .= '</div>';

  // We link to .js and .css file ONLY when the node form is displayed
  switch (variable_get('nodeform_layout', 'default')) {
    // Accordion:
    case 'accordion':
      drupal_add_js($theme_path .'/accordion/jquery.accordion.js', 'theme');
      drupal_add_js($theme_path .'/accordion/accordion.js', 'theme');
      drupal_add_css($theme_path .'/accordion/accordion.css', 'theme');
      break;
    // Vertical tabs:
    case 'vertical':
      drupal_add_js($theme_path .'/vertical_tabs/ui.tabs.min.js', 'theme');
      drupal_add_js($theme_path .'/vertical_tabs/vertical_tabs.js', 'theme');
      drupal_add_css($theme_path .'/vertical_tabs/vertical_tabs.css', 'theme');
      break;
    }

  /* The buttons must be rendered first, because
   * they need to go to the bottom of the form.
   */
  $buttons = drupal_render($form['buttons']);
  return drupal_render($form) . $buttons;
}
?>
There are two problems with the above code. Can you tell what they are? First of all, we have not yet copied the .js and .css files to our theme. Notice the tree structure we have above, so let us respect it (or let us modify the above code): go ahead and copy these files in their respective accordion and vertical_tabs folder — inside your theme folder.

The second problem is in the way we read our layout setting. We're still reading from the module variable:
<?php
  switch (variable_get('nodeform_layout', 'default')) {
?>
We need to read the layout setting from our theme setting, instead. We retrieve this setting by calling the function theme_get_setting() like so:
<?php
  // We links to .js and .css file ONLY when the node form is displayed
  switch (theme_get_setting('nodeform_layout')) {
?>
We are reading the 'nodeform_layout' setting created in steps 3-5.
Time to disable the Node form layouts module. Go to myWebSite/admin/build/modules. Unckeck. Save.
Make sure you've set your node form layout to something other than 'default' on your theme configuration page. Time to test a few things. Let's open a node and click on its Edit tab, to bring about the node form.
Remember step 1? When installing the module we've now disabled, we added something to Garland's template.php file. Make sure you've done this already.
<?php
/**
* Implementation of theme_fieldset(), used to achieve custom styling of
* fieldsets on the node form.
*/
function phptemplate_fieldset($element) {
  // If we're currently at a node form, prepare all fieldsets (except
  // input formats) for further manipulation by jQuery and CSS.
  if (arg(0) == 'node' && (arg(1) == 'add' && arg(2)) || (is_numeric(arg(1)) && arg(2) == 'edit')) {
    if ($element['#parents'][0] != 'format') {
      $element['#attributes']['id'] = form_clean_id('edit-'. implode('-', $element['#parents']) .'-fieldset');
      $element['#attributes']['class'] = 'nodeform-fieldset';
    }
  }

  // Pass the element on to the original theme function for theming.
  return theme_fieldset($element);
}
?>
If we are modifying the Garland theme, we're done now. Everything will work. You can apply all these steps for the Garland theme right now.
A few things need to be done to achieve the same effect for any another theme. These things involve jQuery scripting.
We have modified the Garland theme, and that is just fine. However, we would preserve our Garland theme 'upgrade path' — and would be able to distribute our changes more easily, if we were to create a variation on the Garland theme. In our variation of the Garland theme, we'd use everything that makes the Garland theme what it is, we would only add one feature, the option to theme the node form differently. Only this one feature, and nothing else. For this purpose, we'll create a sub theme, with Garland as 'parent'.
There a few things we need to understand about the creation of sub themes, and what we can expect from them:
To facilitate distribution, we will create a new folder for our sub theme. Let's name our sub theme garland_ext, and name our new folder garland_ext. It is not a requirement for a theme to have its own folder in Drupal 6. Place this new folder under sites/all/themes. No need to place your new theme folder inside its parent's theme folder.
Create in that new folder a file with name garland_ext.info. Open the file in your text editor. In it, copy the following code:
; $Id$
name = Garland extended
description = "Garland theme with special layout options for the node edit form."
core = 6.x
base theme = garland
The name provided for the 'base theme' must be the machine-readable name of the parent theme, that is, the name of the parent theme *.info file. The 'name' property is the name you'll be presented with on the page myWebSite.com/admin/build/themes.
Create in your garland_ext folder a file with name template.php. Open this file in your text editor. In it, copy the following code:
<?php
/*
 * Theming the node form
 */
function garland_ext_node_form($form) {

  // We get the path to our theme
  $theme_path = path_to_theme();

  // We add a CSS id to the buttons
  $form['buttons']['#prefix'] .= '<div id="nodeform-buttons">';
  $form['buttons']['#suffix'] .= '</div>';

  // We link to .js and .css file ONLY when the node form is displayed
  switch (theme_get_setting('nodeform_layout')) {
    // Accordion:
    case 'accordion':
      drupal_add_js($theme_path .'/accordion/jquery.accordion.js', 'theme');
      drupal_add_js($theme_path .'/accordion/accordion.js', 'theme');
      drupal_add_css($theme_path .'/accordion/accordion.css', 'theme');
      break;
    // Vertical tabs:
    case 'vertical':
      drupal_add_js($theme_path .'/vertical_tabs/ui.tabs.min.js', 'theme');
      drupal_add_js($theme_path .'/vertical_tabs/vertical_tabs.js', 'theme');
      drupal_add_css($theme_path .'/vertical_tabs/vertical_tabs.css', 'theme');
      break;
    }

  /* The buttons must be rendered first, because
   * they need to go to the bottom of the form.
   */
  $buttons = drupal_render($form['buttons']);
  return drupal_render($form) . $buttons;
}
/**
* Implementation of theme_fieldset(), used to achieve custom styling of
* fieldsets on the node form.
*/
function garland_ext_fieldset($element) {
  // If we're currently at a node form, prepare all fieldsets (except
  // input formats) for further manipulation by jQuery and CSS.
  if (arg(0) == 'node' && (arg(1) == 'add' && arg(2)) || (is_numeric(arg(1)) && arg(2) == 'edit')) {
    if ($element['#parents'][0] != 'format') {
      $element['#attributes']['id'] = form_clean_id('edit-'. implode('-', $element['#parents']) .'-fieldset');
      $element['#attributes']['class'] = 'nodeform-fieldset';
    }
  }

  // Pass the element on to the original theme function for theming.
  return theme_fieldset($element);
}
?>
Notice that we've named our functions using the machine-readable name of our new theme, ie: garland_ext. We are never to use functions with name phptemplate_* in a sub theme. The code in these functions has remained exactly the same. That code was cut and pasted from my Garland's theme template.php file. Only the functions have been renamed.
Time to copy our scripts and stylesheets to our new folder. Move the accordion and vertical_tabs folders to your new theme folder. These folders have reached their final destination. Then, take the theme-settings.php file we had created previously in the Garland theme folder, and move it to your new theme folder. Here is the tree structure of our garland_ext folder as it should appear now:
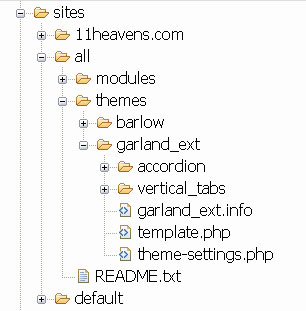
Open your Garland Extended theme-settings.php file in a text editor. The function that we had defined needs to be renamed...
From this:
<?php
function phptemplate_settings($saved_settings) {
?>
To that:
<?php
function garland_ext_settings($saved_settings) {
?>
Undo all the changes you made to the Garland theme, that is, cut/delete the code we added to the Garland theme template.php file. Then delete the theme-settings.php file if you had created one from scratch previously. Make sure you have copied — or better moved — that file to your new theme folder during the previous step.
Go to the page myWebSite.com/admin/build/themes. Do you see your new theme in the list? Select it. Make it your default. Save. You are done.

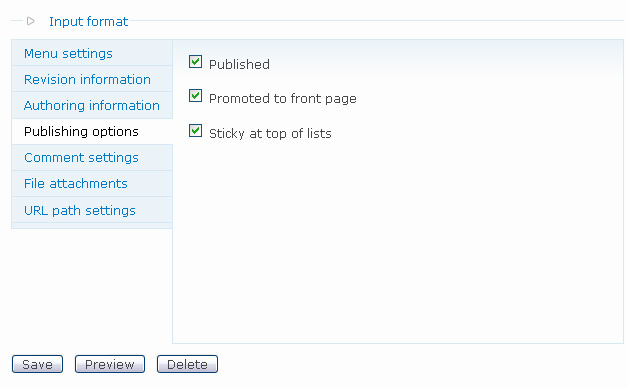
Go ahead and select a node form layout other than the 'Default' one on your new theme configuration page. Let's open a node and click on its Edit tab, to bring about the node form. Is everything appearing as it should? On my end, it does. For a 'Vertical tabs' layout, I get this:
Attached to this post is the TAR file which contains our new Garland Extended theme.
Did you find this tutorial useful? Is there something I wrote that deserves more explanation? Did I say something foolish...? Let me know by commenting. Thank you for reading.
| Attachment | Size | Hits | Last download |
|---|---|---|---|
| garland_ext.tar | 40.5 KB | 26 | 13 years 19 weeks ago |
Comments
Just what I needed
Thanks for this article. I needed a quick intro to doing sub themes the right way in D6 and Part 3 of this is just perfect!
Theme inheritance
Beware of a bug which hasn't (yet) been fixed in the latest Drupal 6 distribution, 6.4.
The bug is that a base theme's preprocess functions prefixed with THEME_NAME are not run in its sub-themes. In other words, they are not inherited by the sub-themes. The trick for now is to use the theme engine prefix in the base theme.
Drupal 6 head has been fixed now, so the next Drupal 6 revision will be ok.
Candidate function has no effect
Hi everybody,
Thx for this tutorial it is very helpfull and save a lot of time.
But I 've got a small question...When I try to adapte you explanation to Drupal6..
This exemple is using the garland theme
I declare a theme_hook who register 2 themes functions:
And I override function phptemplate_node_form()
And I create the story_custom.tpl.php file ...
Everything works as expected
But there's no differences between content type in the edit context ...
So What could I do ? ...
We're also given under Candidate function names a list of functions names we can use to override the theming function. Because we're working with a base theme, we'll pick the name phptemplate_node_form. If you were looking at the node edit form of a 'story', you would find in the list of candidate function names phptemplate_story_node_form. Or, if you were looking at the node edit form of a 'book page' you'd find phptemplate_book_node_form. Hence, it's possible to theme the edit form for nodes of a specific content type right-out-of-the-box.
Assuming that ... I just need to change the phptemplate_node_form() to phptemplate_story_node_form() ... but in this case nothing append and my template is no more called.
So, are candidate fuction no more effect on D6?
Note:
What I 'm doing wrong ?
Any advice will be appreciated !!
Interestingly enough, we
I noticed this, from Better Formats module, which may offer an explanation:
function better_formats_form_alter(&$form, $form_state, $form_id) {

  // Alter new node and comment forms.

  // Using $form['#id'] instead of $form_id because $form_id is in the form of

  // 'TYPE_node_form' which varies with the content type while $form['#id']

  // is always 'node-form'.

  switch ($form['#id']) {

   .....

  }
Nice blog and absolutely
Nice blog and absolutely outstanding. You can do something much better but i still say this perfect.Keep trying for the best.
bonus bingo en ligne
I really thank you for the
I really thank you for the valuable info on this great subject and look forward to more great posts. Thanks a lot for enjoying this beauty article with me. I am appreciating it very much! Looking forward to another great article. Good luck to the author! All the best!
jouer au keno
Hey. Thanks for the
Hey.
Thanks for the tutorial. I followed it carefully.
However, I'm not a programmer.
I haven't qute grasped how to change the order of how things appear on the form in the end - i.e the order of the different field sets. I presume that this would be in the javascript file - jquery.accordion.js for example. But I don't know the specifics....
any help would be greatly appreciated.
thanks
thanks a lot for this great
thanks a lot for this great tutorial
great blog
betting||betting I'll make sure to bookmark it and return to read more of your useful information. Thanks for the post. I will definitely return.
What we see in the green
What we see in the green rectangle overlaid on the screen capture has been added by the Node form layouts module. We would like to see this field not on the node settings page, but rather on the theme configuration page at myWebSite.com/admin/build/themes/settings/myTheme.
http://e-papierossy.com.pl/en/e-papierosy/67-e-papierosy-gombit-134577.html
http://e-papierossy.com.pl/en/e-papierosy/70-e-papierosy-gombit-54246.html
site de bon de réduction
I'm very happy to discover this site. I need to to thank you for your time just for this fantastic read!! I definitely enjoyed every part of it and i also have you bookmarked to check out new stuff on your site. bon de réduction
Future residents will be
Future residents will be able to walk to the nearby Sun Plaza or a short drive to Causeway Point for some family fun and gatherings. A truly unique lifestyle awaits you at Skypark Residences.
Skypark Residence
Due to the humid nature of
Due to the humid nature of Singapore, flea control products are part and parcel of Dog Grooming. This must be quickly removed so that the dogs can have a good time to do grooming. pet care singapore
Boardwalk Residences in Sengkang Fernvale Close
The condo’s facilities provide full family entertainment needs for your family and loved ones. Indulge in a serene and tranquil lifestyle right in the heart of Sengkang. Boardwalk Residences Site Plan
Boardwalk Residences Floor Plans
Boardwalk Residences in Sengkang Fernvale Close
Fernvale Condo is a 99-years leasehold private condominium development located at Sengkang West Way / Fernvale Link in District 19. With expected completion in mid 2017, it comprises of TBA towers with estimated 590 units and stands TBA storeys tall. Boardwalk
Lakeville is also near elite
Lakeville is also near elite schools such as Fuhua Primary School and St Anthony Primary School. Yuhua Primary School and Shuqun Secondary School are also around in the area. new condo launch
Highline Residences has full
Highline Residences has full and unique facilities, which includes a guard house, clubhouse, children’s playground, swimming pool, Aerobic/Yoga room, piano room, pool room, indoor gym, hydrotherapy beds, hydrotherapy baths, reading room, function room, onsen, jacuzzi. new launch preview
The Santorini will be
The Santorini will be accessible via the upcoming Tampines West MRT Station, which is just next to it. Commuting to the city area as well as the Serangoon area is therefore very convenient. Tampines Ave 10 Condo
The is situated right beside
The is situated right beside Kent Ridge Park. Future residents will be able to access the nearby IKEA and Anchorpoint which is a short drive away for some family fun and gatherings. A truly unique lifestyle awaits you. The Interlace at jurong west st 41