Working on the product pages
Although we will want the browser to execute our JavaScript code on product pages only, we will not add our JavaScript code to product.liquid. We could, but we prefer to add all JavaScript to the head element of the document — where we can find all code in a snap, even when tired and confused. Open up your theme.liquid template, and add this Liquid condition to it: {% if template == 'product' %}. We also want to modify the document when it's ready, so we'll wrap everything in a function that will be executed when that happens.
{{ 'jquery-1.2.6.min.js' | asset_url | script_tag }}
{{ 'jquery.selectboxes.pack.js' | asset_url | script_tag }}
<script type="text/javascript">
  jQuery.noConflict();
  {% if template == 'product' %}
  jQuery(function() {
    /* All our descrambling code will be here */
  });
  {% endif %}
</script>Using a JavaScript Object to hold all of our stuff
We'll create a JavaScript Object to hold the info we read about our variants. This Object will also define functions we'll call, one after the other, to parse the variants titles, then build select boxes and then update the document appropriately when a visitor makes a selection. We will not create an Object to look like cool rock-on JavaScript programmers, but to make it easier to debug our code using Firebug.
Amend the above JavaScript to include the new Descrambler Object.
  jQuery.noConflict();
  {% if template == 'product' %}
  Descrambler = {
    // We will define a bunch of properties here,
    // among which there will be at least 5 functions.
    // Did you know that everything is a property
    // of an object in JavaScript?
    // A function is a property too.
    // @see this article:
    // http://11heavens.com/everything-is-a-property-of-an-object-in-javascript
  }
  jQuery(function() {
    // Here, we'll call functions of the Descrambler object.
    // One after the other.
    // To get the job done.
    Descrambler.hideCurrentSelectionBox();
    Descrambler.buildAttrLists();
    Descrambler.addSelectBoxes();
    Descrambler.addPriceBox();
    Descrambler.addListenerOnSelection();
  });
  {% endif %}
Let's work a little harder and define some properties for our Object. We will initialize some properties as we define them. For now, functions will be empty shells: they will do nothing. We will fill up the gaps later on.
  jQuery.noConflict();
  {% if template == 'product' %}
  Descrambler = {
    delimiter: ' - ', // This is a sequence of characters. A String.
    variants: {}, // Object containing info on variants.
    totalAttr: 0, // Number of attributes for the product.
    hideCurrentSelectionBox: function() {
      // Hide the unsightly select box. Yuck.
    },
    buildAttrLists: function() {
      // Come up with lists of attributes.
      // We will update the totalAttr variable here.
    },
    addSelectBoxes: function() {
      // Add selection boxes to the page.
    },
    getCurrentSelection: function() {
      // Return the variant title that corresponds to what is currently selected.
    },
    addPriceBox: function() {
      // Add a placeholder element to display the price.
    },
    addListenerOnSelection: function() {
      // Add a listener to the new select boxes.
      // When visitor makes a selection, modify both the price
      // and the current selection on the hidden form element.
    }
  }
  jQuery(function() {
    Descrambler.hideCurrentSelectionBox();
    Descrambler.buildAttrLists();
    Descrambler.addSelectBoxes();
    Descrambler.addPriceBox();
    Descrambler.addListenerOnSelection();
  });
  {% endif %}
We need a delimiter.
When our JavaScript will read each variant title, it will need to know where one attribute name ends and an other begins. A naming convention for the variant title will solve that problem for us. We need a delimiter. The delimiter can be anything at all, except a character that'll possibly get included within an attribute name (such as a space). However, the delimiter must look good, not be something tacky like *, because the delimiter will be part of the variant title, hence displayed on the cart page &mdash and shown on product pages to visitors who browse without JavaScript. The following delimiter is good enough: - . Space-hyphen-space. Pick what you want. Just respect your naming convention whenever you fill up that variant title field while creating new products. And amend the code to reflect your choice. That's a single line of code to edit.
delimiter: ' - ', // This is a sequence of characters. A String.
Displayin' none that unsightly select box
We won't remove the current list of variants. We will simply hide it. Later on, after we've added our own select boxes, we'll want to update the current selection in the hidden "box" whenever the visitor makes a selection in the new boxes. Our new boxes will be just for show. None of their values will be submitted with the Add to Cart form — in other words.
In the Vogue theme, the variants are radio elements. Radio elements come with labels, and wishing to hide all of this, I will select the list that contains these radios and labels, and apply jQuery.hide() to it, like so:
hideCurrentSelectionBox: function() {
  jQuery('#product-variants ul').hide();
},
Building list of attributes
We will read each variant title and split it in parts using our delimiter. We will put the first part in one bag (a first Array we'll call attributes_0), then we'll put the 2nd part in a 2nd bag (Array named attributes_1), third part in third bag, etc. for as many parts as the variant title contains. Before we blindly put a part in a bag, we'll look into the bag to see if a part with the same name is not already in there.
Additionally, while we loop through the product variants, we'll record information about each variant: the variant's title, its unique ID, and its price. We will need to refer to this information later on. We will use the following Object to hold our information: Descrambler.variants.
buildAttrLists: function() {
  var firstTitle = jQuery.trim('{{ product.variants.first.title }}');
  this.totalAttr = firstTitle.split(this.delimiter).length;
  for (var i = 0; i < this.totalAttr; i++) {
    // Initializing each Attributes Array.
    this['attributes_' +i] = [];
  }
  var split = []; // Initializing a split result.
  {% for variant in product.variants %}
  var variantTitle = jQuery.trim('{{ variant.title }}');
  this.variants[variantTitle] = {};
  this.variants[variantTitle].id = '{{ variant.id }}';
  this.variants[variantTitle].price = '{{ variant.price }}';
  split = variantTitle.split(this.delimiter);
  for (var j = 0; j < split.length; j++) {
    // If the attribute option is not yet recorded to its Attribute Array.
    if (jQuery.inArray(split[j], this['attributes_' + j]) == -1) {
      this['attributes_' + j].push(split[j]);
    }
  }
  {% endfor %}
},
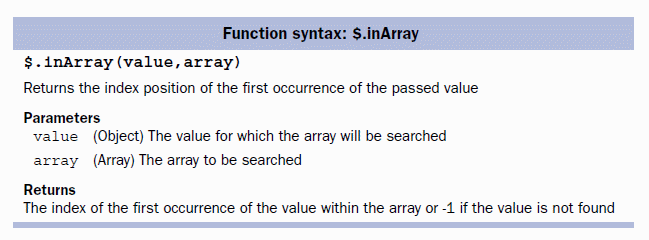
Taken from jQuery in Action
Adding select boxes
The API of the jQuery plugin Select box manipulation is quite simple. The matter in which we add options to a select box is demonstrated here:
var myOptions = {
  "Value 1" : "Text 1",
  "Value 2" : "Text 2",
  "Value 3" : "Text 3"
}
$("#myselect").addOption(myOptions);
In our case, value and text will be the same. We will create each select box with jQuery('<select></select>').
addSelectBoxes: function() {
  for (var i = 0; i < this.totalAttr; i++) {
    var options = {};
    for (var j = 0; j < this['attributes_' +i].length; j++) {
      var option = this['attributes_' +i][j];
      options[option] = option;
    }
    var labels = ['Choose a quantity:', 'Choose a flavor:', 'Sugar or no sugar:'];
    jQuery('<label for="select_' + i + '"></label>').html(labels[i]).appendTo('#product-variants');
    jQuery('<select></select>').addOption(options).attr('id', 'select_' + i).appendTo('#product-variants').find('option:first').attr('selected', 'selected');
  }
},
We start by creating the select box, then we add options to it, then we give it an id attribute, append it to the div with id 'product-variants', and, it's not over, we select the first option and mark it as selected. Using jQuery, we can chain all these actions, we can make it all happen with one single instruction, that is, one line of code followed by a semicolon.
What variant title is being chosen
We need a utility function, one that will read the values of our select boxes and reconstruct from these values the title of a variant.
getCurrentSelection: function() {
  var currentValues = [];
  for (var i = 0; i < this.totalAttr; i++) {
    currentValues.push(jQuery('#select_' + i).val());
  }
  var currentVariantTitle = currentValues.join(this.delimiter);
  return currentVariantTitle;
},
How much does this cost
We will add a placeholder element to the page in which we will display the price of the currently selected variant. We will put something in this placeholder right away, we will initialize its value.
addPriceBox: function() {
  var firstVariantTitle = '{{ product.variants.first.title }}';
  var price = (parseFloat({{ product.variants.first.price }}) / 100);
  jQuery('<p></p>').attr('id', 'variant_price').html('Base price: $' + price.toFixed(2)).appendTo('#product-variants');
},
Updating the price and the variant selection
We will now add a listener to the new select elements so that whenever a visitor picks something from either of these boxes, we update the price displayed on the page and select the corresponding variant in the hidden select box. That hidden box will still be part of the document and its value will get submitted with the form when the customer clicks on the Add to Cart button.
addListenerOnSelection: function() {
  jQuery('select').change(function() {
    var currentVariantTitle = Descrambler.getCurrentSelection();
    var newId = Descrambler.variants[currentVariantTitle].id;
    var newPrice = Descrambler.variants[currentVariantTitle].price;
    newPrice = parseFloat(newPrice) / 100;
    // Here we select the radio button which corresponds to our variant id.
    jQuery(':radio[name=id]').val(newId);
    // Here we update the price shown on the page.
    jQuery('#variant_price').hide().html('New price: $' + newPrice.toFixed(2)).fadeIn('slow');
    return true;
  });
}
The price will be updated when a new selection is made.
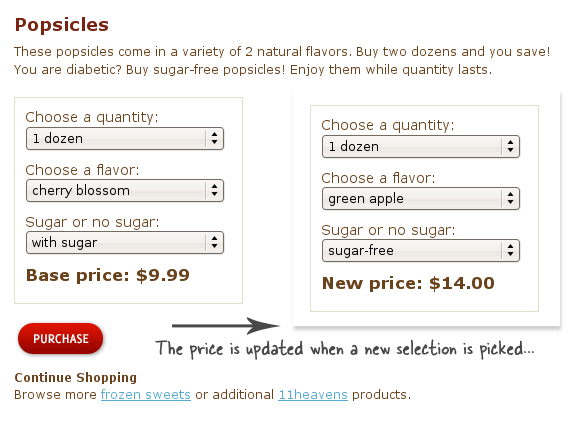
And we're done.
Something not working? Time to test
Click on the Firebug icon at the bottom right of your Firefox navigator window, or press F12.
Open your console. Then, type Descrambler in the right portion of the Firebug panel.

Then press Run.
Expand the Descrambler Object by clicking on it. We'll examine its content.
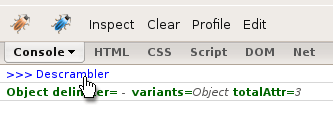
Here is what I see for the Popsicles product.
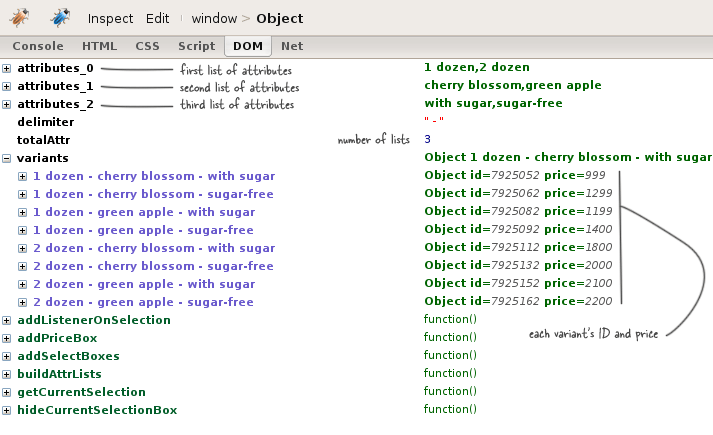
Things to look for:
- Do the Arrays attributes_0, attributes_1 contain what they should...?
- Do you have the right number of categories of attributes, ie: totalAttr ?
- Does the Object variants contain an accurate description of your variants?
Common mistakes:
- Leaving behind a few uncommented console.log's. This will cause problems in IE.
- Creating an element like this:
jQuery('<select>'). That's deprecated jQuery, and could cause problems in IE. Use the full HTML fragment, ie:jQuery('<select></select>') - Putting a comma after the last property in the
Descramblerdefinition. Some browsers tolerate an extra comma after the last member of an object or element of an array, but some do not. IE and Opera will ignore everything that comes after the extra comma, without generating any error. Beware of this. This is most often referred to as the trailing comma bug.
In conclusion
If you've used this tutorial for your shop, consider dropping me a thank you line here, and/or donate to my website. I don't work for Shopify. No one is paying me to write these tutorials. I am doing this to help the Shopify community. Ironically, I am doing myself a disservice, because if I show you how to do these things, and do this well enough, then you won't need to hire me do do these things for you ;-) Thanks.