My top 10 favorite theming tweaks for content
Here is a collection of my 10 favorite 'tweaks' to content template files in Drupal 6. I will add one simple tweak a day, starting today.
Theming comments by the node's author
You want the comment style to be different for comments added by the author of a node — who's commenting on his own node. For example, you may want to highlight the node's author's comments, so that any visitor skimming through the comments will easily differentiate them from other comments.
Solution
Edit comment.tpl.php to add a new class (let's say 'comment-by-author-of-post') that...
you can style in your theme's style.css.
Your file comment.tpl.php may look like this before the edit (I am only providing a snippet of the template here):
<div class="comment<?php print ($comment->new) ? ' comment-new' : ''; print ' '. $status ?> clear-block">If it does, then you will change the above snippet to that:
<div class="comment<?php print ($comment->new) ? ' comment-new' : ''; print ($comment->uid == $node->uid) ? ' comment-by-author-of-post' : ''; print ' '. $status ?> clear-block">You could now add these two rules to your style.css file, for example:
/**
 * Comment styling rules
 */
.comment-by-author-of-post {
  border: 1px solid #ccc;
  background-color: #eee;
}
/* reset to default values when previewing */
.preview .comment-by-author-of-post {
  border: none;
  background-color: transparent;
}
This will work in Drupal 5 as well. No, it won't. The $node object is not passed to the comment.tpl.php template. Read the comments below for the Drupal 5 recipe. This solution works only for PHPTemplate-powered themes. If your theme does not provide a template file for comments, copy the one from modules/comment/ to your theme folder, and edit it. And yes, the $node object is available in comment.tpl.php. It is the node the comment is attached to. Possible variations: special-style all comments authored by those who have the 'admin' role; special-style anonymously-submitted comments; etc.
Displaying the content type name
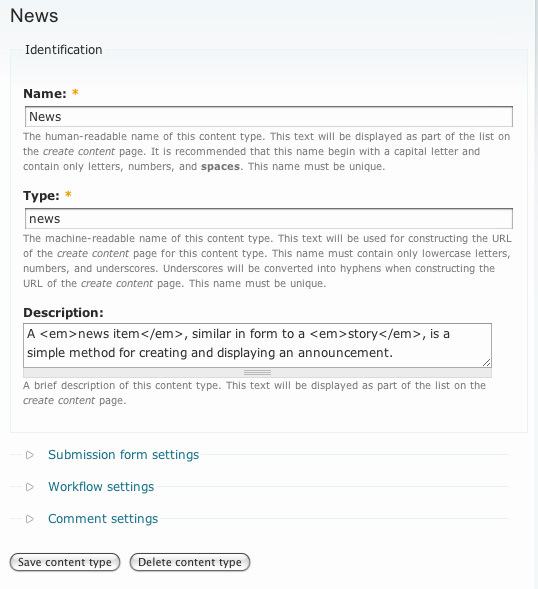
You want to print the content type name along with the 'submitted' info. This will be particularly useful for those who have created custom content types, with or without CCK.
Solution
Edit node.tpl.php to add the content type name within a span with a class name (e.g. 'content-type-name') and...
style that span element in your theme's style.css file.
In the following example, the human-readable name for the content type is 'News', and the content type is displayed to the right of the 'submitted' info. Let's try and achieve that.

Your file node.tpl.php may look like this before the edit (I am only providing a snippet of the template here):
<?php if ($submitted): ?>
    <span class="submitted"><?php print $submitted; ?></span>
<?php endif; ?>
If it does, then you will change the above snippet to that:
<?php if ($submitted): ?>
<span class="submitted"><?php print $submitted; ?> — <span class="content-type-name"><?php print node_get_types('name', $node); ?></span></span>
<?php endif; ?>You may want to exclude a certain content type. For example, you may not want 'page' to appear in page nodes. Whenever you want to exclude one content type, you will do like so:
<?php if ($submitted): ?>
<span class="submitted"><?php print $submitted; ?><?php print ($node->type != 'page') ? ' — <span class="content-type-name">' . node_get_types('name', $node) . '</span>' : ''; ?></span>
<?php endif; ?>When you want to exclude more than one content type, say 'story' and 'page', you will do like so:
<?php if ($submitted): ?>
<span class="submitted"><?php print $submitted; ?><?php print (!in_array($node->type, array('story', 'page'))) ? ' — <span class="content-type-name">' . node_get_types('name', $node) . '</span>' : ''; ?></span>
<?php endif; ?>This will work in Drupal 5 as well. Again, this solution works only for PHPTemplate-powered themes.
You need to provide the machine-readable names for content types you wish to exclude, because $node->type is used in the condition, and it is the machine-readable name for the content type. Why are we comparing machine-readable names? Simply to avoid database queries. There is one database query we cannot avoid in our solution, it is the one query we execute to print the human-readable name for the content type.
Possible variations: place the content type information somewhere else in the node; display the content type information only in the teaser; etc.
Quick edit and delete links for the Administrator
You want to add quick edit links to the teaser view of your nodes — one link to edit the node, and another to delete it, and you want these links to be shown only to users with the 'administer nodes' permission. Alternatively, you may want these links to be viewed only by the user with uid (user ID) 1.
First Solution
Edit node.tpl.php to add an unordered list of 2 links, contained within a div with a class name (e.g. 'quick-edit-links') and...
style these links in your theme's style.css file.
Say you would like anyone who's logged-in and who has 'administer nodes' permission to see these two additional links below the teaser of every node: Edit [content-type-name] and Delete [content-type-name], like so:

Let's get to it.
In your theme folder, your file node.tpl.php may look like this before the edit (I am only providing a snippet of the template here):
<?php if ($links): ?>
  <div class="links"><?php print $links; ?></div>
<?php endif; ?>
Below the above code, you will add your new 'quick edit' links like so:
<?php if ($teaser && user_access('administer nodes')): ?>
  <?php $content_type_name = node_get_types('name', $node); ?>
  <?php $quick_links['quick-edit'] = array('title' => 'Edit ' . $content_type_name, 'href' => 'node/' . $nid . '/edit'); ?>
  <?php $quick_links['quick-delete'] = array('title' => 'Delete ' . $content_type_name, 'href' => 'node/' . $nid . '/delete'); ?>
  <div class="links quick-edit-links">
    <?php print theme('links', $quick_links, array('class' => 'links inline')); ?>
  </div>
<?php endif; ?>
In the above snippet, you build a new array of links, $quick_links, and you theme that array with the function theme('links', ...).
You may prefer to write the markup yourself, using the Drupal function l(), like so:
<?php if ($teaser && user_access('administer nodes')): ?>
<?php $content_type_name = node_get_types('name', $node); ?>
  <div class="links quick-edit-links">
    <ul class="links inline">
      <li class="first quick-edit"><?php print l('Edit ' . $content_type_name, 'node/' . $nid . '/edit'); ?></li>
      <li class="last quick-delete"><?php print l('Delete ' . $content_type_name, 'node/' . $nid . '/delete'); ?></li>
    </ul>
  </div>
<?php endif; ?>
Second Solution
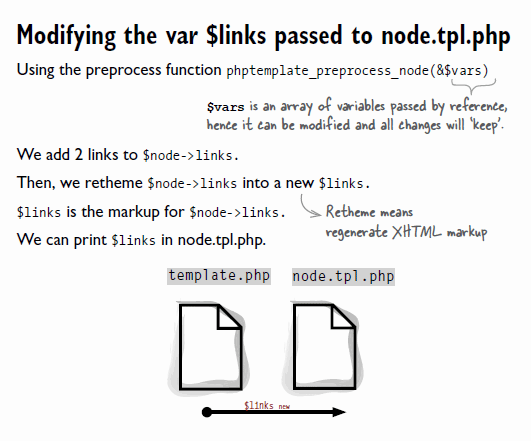
In template.php, using a preprocess function, add 2 new links to $node->links and re-theme (like a re-rince) $node->links to overwrite the existing $links variable. And... style as needed.
Let me show you what I mean. You may want to add the quick edit links next to the other node links, like so:

To achieve this, in your theme's template.php file, you will add a prepocess function for your node template. Open your theme template.php file in a text editor, and add the following code:
<?php
/**
 * Override or insert PHPTemplate variables into the node template.
 */
function phptemplate_preprocess_node(&$vars) {
  // If we are in teaser view and have administer nodes permission
  if ($vars['teaser'] && user_access('administer nodes')) {
    // get the human-readable name for the content type of the node
    $content_type_name = node_get_types('name', $vars['node']);
    // making a back-up of the old node links...
    $links = $vars['node']->links;
    // and adding the quick edit link
    $links['quick-edit'] = array(
      'title' => 'Edit ' . $content_type_name,
      'href' => 'node/' . $vars['nid'] . '/edit',
    );
    // and then adding the quick delete link
    $links['quick-delete'] = array(
      'title' => 'Delete ' . $content_type_name,
      'href' => 'node/' . $vars['nid'] . '/delete',
    );
    // overwriting the $links variable with our new links THEMED
    $vars['links'] = theme('links', $links, array('class' => 'links inline'));
  }
}
?>
Here's what you've done:
The first solution will work in Drupal 5 as well. Both solutions work only for PHPTemplate-powered themes. With the first solution, it's easy to place the additional links anywhere in the node view.
If you want your quick edit links to be viewed only by the all-mighty Administrator, in your file node.tpl.php, you will replace this code...
&& user_access('administer nodes')
... with that one:
&& ($user->uid == 1)
A little variation
Showing these links to people with 'administer nodes' permission is quite restrictive: chances are only a handful of people — maybe one person — have access to the Administration section for content.
You may have a web site with many contributors. Some will have 'edit' permission to some or all of the site content, with or without a right to 'delete'. When the situation is relatively complex, and you do want quick edit links whenever possible, you can rely on the Drupal's function node_access($op, $node, $account = NULL) as Roger López points out in this comment. The preprocess function rewritten with the use of node_access() becomes:
<?php
/**
 * Override or insert PHPTemplate variables into the node template.
 */
function phptemplate_preprocess_node(&$vars) {
  // If we're in teaser view and have right to update(edit) the node
  if ($vars['teaser'] && node_access('update', $vars['node'])) {
    // get the human-readable name for the content type of the node
    $content_type_name = node_get_types('name', $vars['node']);
    // making a back-up of the old node links...
    $links = $vars['node']->links;
    // and adding the quick edit link
    $links['quick-edit'] = array(
      'title' => 'Edit ' . $content_type_name,
      'href' => 'node/' . $vars['nid'] . '/edit',
    );
    // and then adding the quick delete link
    // if we have the right to delete the node
    if (node_access('delete', $vars['node'])) {
      $links['quick-delete'] = array(
        'title' => 'Delete ' . $content_type_name,
        'href' => 'node/' . $vars['nid'] . '/delete',
      );
    }
    // overwriting the $links variable with our new links THEMED
    $vars['links'] = theme('links', $links, array('class' => 'links inline'));
  }
}
?>Putting some order in your terms
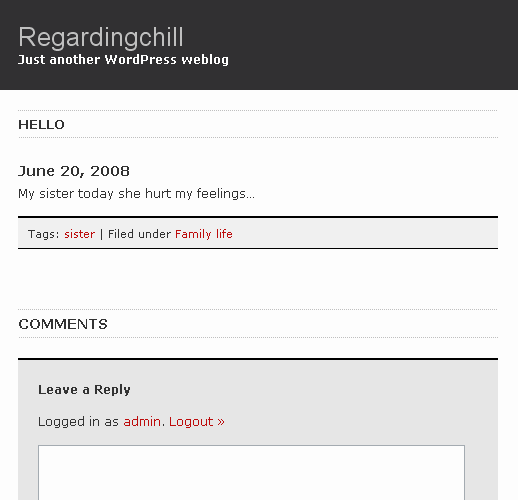
In Wordpress, unlike in Drupal, terms are not lumped together in posts. Each Wordpress vocabulary has its own “template tag”, and the ones that come out-of-the box are: the_tags(), and the_category(). The following theming tweak is about putting order in Drupal terms before they're output to screen. It you need to break up your terms by vocabulary before you display them, read on.
Here's a Wordpress blog entry:
I will present an all-purpose solution that will print all terms by vocabulary. Each vocabulary list will be wrapped in its own HTML element, and I will use the vocabulary name as a 'label' for each list — a label you will be able to edit in the Administration Section of your Drupal site.
Solution
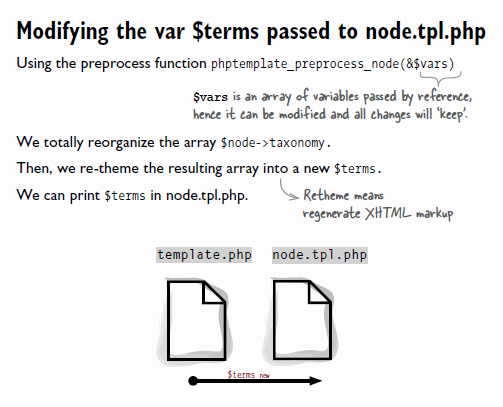
Edit template.php to rebuild your $node->taxonomy array...
... and re-theme that array into a new $terms variable... and then...
style your terms as needed in style.css.
Say you have two vocabularies, one for “free tagging”, and another for filing posts under sections, like so:
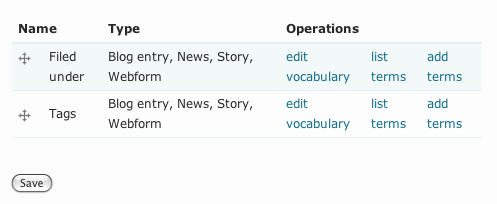
You may not like your free tags to be lumped together with your “Filed under” terms.
You may prefer to see something like this:

Let's get to it.
You will use a prepocess function for your node template. You will add this function to template.php if it has not already been defined. Open your theme template.php file in a text editor, and add the following code (please read the comments):
/** * Override or insert PHPTemplate variables into the node template. */ function phptemplate_preprocess_node(&$vars) { // If we have any terms... if ($vars['node']->taxonomy) { // Let's iterate through each term. foreach ($vars['node']->taxonomy as $term) { // We will build a new array where there will be as many // nested arrays as there are vocabularies // The key for each nested array is the vocabulary ID. $vocabulary[$term->vid]['taxonomy_term_'. $term->tid] = array( 'title' => $term->name, 'href' => taxonomy_term_path($term), 'attributes' => array( 'rel' => 'tag', 'title' => strip_tags($term->description), ), ); } // Making sure vocabularies appear in the same order. ksort($vocabulary, SORT_NUMERIC); // We will get rid of the old $terms variable. unset($vars['terms']); // And build a new $terms. foreach ($vocabulary as $vid => $terms) { // Getting the name of the vocabulary. $name = taxonomy_vocabulary_load($vid)->name; // Using the theme('links', ...) function to theme terms list. $terms = theme('links', $terms, array('class' => 'links inline')); // Wrapping the terms list. $vars['terms'] .= '<div class="vocabulary taxonomy_vid_'; $vars['terms'] .= $vid; $vars['terms'] .= '">'; $vars['terms'] .= $name; $vars['terms'] .= ': '; $vars['terms'] .= $terms; $vars['terms'] .= '</div>'; } } }
Here is what the preprocess function does essentially:
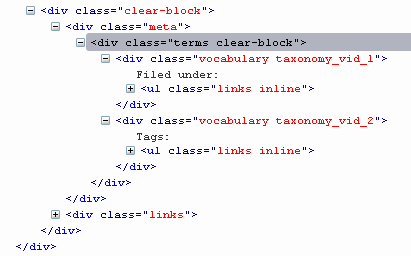
The new HTML generated from print $terms (in node.tpl.php) is shown in this Firebug screen capture:
Creating PHPTemplate variables to pass on to your node.tpl.php template
As Opusoid recommends in a comment below, you can add each vocabulary to a new variable, that you pass on to your node template. In node.tpl.php, you can output each vocabulary variable wherever you wish. It gets super easy to place each vocabulary list in a precise location in the node: above it, below it, wherever you want. Brilliant, Opusoid, thank you!
Ordering vocabularies by weight — Improved version by manuee
Manuee modified the code snippet above to order vocabularies by weight. This is something you'll most likely prefer to do. After all, that's what weight is all about: presentation order. His code snippet is in his comment below. Thanks manuee!
Does that work in Drupal 5?
This solution will work in Drupal 6 only. Of course, there's an equivalent method for Drupal 5, and if someone asks for it I will provide it.
CSS styling
You may need to style your terms if you want them to appear on the same line, like so (these are rules added to the Garland theme style.css file):
/**
 * Terms styling rules
 */

.vocabulary {
  display: inline-block;
  padding-right: 1.5em;
}

.terms {
  float: none;
}
Adding 'Last edited by name some time ago' information
Administrators are presented with a special marker when content is new or has been updated in the Administration section of their site at webSite.com/admin/content/node. Additionally, in node lists, the module tracker informs any logged-in user if he or she hasn't read a particular (recently created) node (using the marker new), or if a node he/she's read already was modified (using the marker updated). You, the themer, may want everyone, including “anonymous users”, to be informed of updates to nodes right inside their content. This information may specify who last edited the node and when. Note that the last editor of a content may not be the creator of that content, and I'll take this into account in my “solution”. In the following theming tweak, you'll add Last edited by name some time ago information to your nodes' content.
Here is what you'll try to achieve:

Solution
Edit the file template.php to pass an additional variable to the node template, a variable we'll call $last_edit...
print that variable in our node.tpl.php file, and...
style this added markup as needed in style.css.
Before you apply this solution to your theme, we will review how Drupal deals with node editing and node revisions. Read carefully.
When a node is simply edited, with no new revision created
If the editor of the node doesn't edit the Authored by field under Authoring information, the recorded author of the node remains unchanged. What that means is that the variables $name and $uid in node.tpl.php will output the same HTML. However, if the editor is not the person who authored the node, the revision_uid (user ID) of the current revision does change to show who edited the node. In node.tpl.php, the variable $revision_uid always tells us who was the last person to edit the current version of a node.
If the editor changes the Authored by field under Authoring information, the variables $name and $uid in node.tpl.php will change to reflect whatever user the editor has picked as new author. However, still in node.tpl.php, the variable $revision_uid will provide us with the user ID of the editor.
No one with permission to edit a node can effectively edit it without a record of his action being saved to the Drupal database, a record of his action under his name. The info about any node version in the table {node_revision} will tell us when and by whom that version was last edited.
When a new revision of a node is created
What has been said previously still applies. If the Authored by field isn't edited, the author of the new revision and the author of the old revision will be the same person, regardless of who created the new revision. The variable $revision_uid will provide us with the user ID of the creator of the new revision.
If the editor changes the Authored by field under Authoring information when creating a new revision, the info about the author of the node will reflect that change.
Variables available to node.tpl.php — that you will use
What follows is a partial list of the variables available to node.tpl.php.
Available variables:
* - $page: Flag for the full page state.
* - $name: Themed username of node author output from theme_username().
* - $uid: User ID of the node author.
* - $vid: Current version ID of the node, e.g. the version to output.
* - $revision_uid: User ID of the last editor of the node version with $vid.
* - $created: Time the node was published formatted in Unix timestamp.
* - $changed: Time the node was last edited formatted in Unix timestamp.
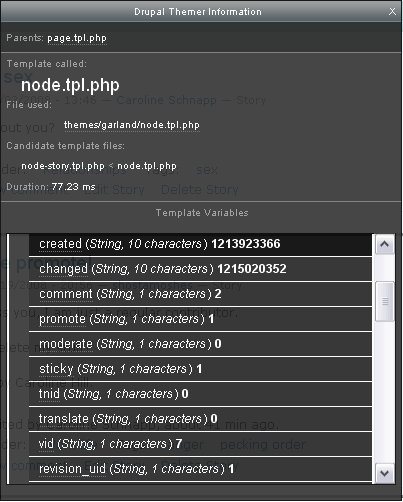
You can find an exhaustive list of the variables available to node.tpl.php if you inspect a node's content using the Themer Info widget that comes with the Devel module. Look under Template Variables:
Passing a new variable to print in the node template
You will use a prepocess function to pass a new, e.g. additional, variable to your node template, ie: $last_edit. Hence, you will need to add a phptemplate_preprocess_node() function if it has not already been defined to your template.php file. Open your theme template.php file in a text editor, and add the following code (please do read the comments):
/**
* Override or insert PHPTemplate variables into the node template.
*/
function phptemplate_preprocess_node(&$vars) {
  /*
   * If the node is shown on its dedicated page and
   * the node was edited after its creation.
   */
  if ($vars['page'] && $vars['created'] != $vars['changed']) {
    $time_ago = format_interval(time() - $vars['changed'], 1);
    /*
     * If the last person who edited the node
     * is NOT the author who created the node.
     */
    if ($vars['uid'] != $vars['revision_uid']) {
      // Let's get the THEMED name of the last editor.
      $user = user_load(array('uid' => $vars['revision_uid']));
      $edited_by = theme('username', $user);
    }
    /*
     * If the last person who edited the node
     * is also the author who created the node,
     * we already have the THEMED name of that person.
     */
    else {
      $edited_by = $vars['name'];
    }
    /* Adding the variable. */
    $vars['last_edit'] = t('Last edited by !name about @time ago.',
      array('!name' => $edited_by, '@time' => $time_ago));
  }

}
After that, you edit your node.tpl.php file to print your new variable. Take note that the variable will be undefined if we're on a node list page, or if the node wasn't edited since its creation. So we won't add a div unless our variable is defined.
<?php if ($last_edit): ?>
  <div class="last-edit clear-block">
    <small><?php print $last_edit; ?></small>
  </div>
<?php endif; ?>
A bit of styling
You can pick a special color for that added text, and increase the white space above and below it, with this CSS rule, added to the style.css stylesheet of your theme:
/**
 * Last edit rules
 */

.last-edit {
  color: #ca481c;
  margin: 1em 0pt;
}
Because it makes use of a preprocess function, this solution will work in Drupal 6 only. There's an equivalent method for Drupal 5 themes, and if someone asks for it I will provide it.
A few questions and their answer
Question 1. Why use the function theme('username', ...)? Why aren't we just outputing the name of the editor as is?
You could. When using the function theme('username', $user), the name of the user becomes a link to his profile page under certain conditions. It's very likely you may not like that. If you don't, just output the name like so (this is a snippet only):
/*
 * If the last person who edited the node
 * is NOT the author who created the node.
 */
if ($vars['uid'] != $vars['revision_uid']) {
  $user = user_load(array('uid' => $vars['revision_uid']));
}
/*
 * If the last person who edited the node
 * is also the author who created the node,
 * we already have the THEMED name of that person.
 */
else {
  $user = user_load(array('uid' => $vars['uid']));
}

/* Reading the name property of the user object */
$edited_by = $user->name;

/* Adding the variable. */
$vars['last_edit'] = t('Last edited by @name about @time ago.',
  array('@name' => $edited_by, '@time' => $time_ago));
Note that I am using @name instead of !name in the translation function now. That's because I want the user name to be escaped properly and sanitized before being output to screen. Always do this for user names. The ! prefix used for a placeholder means that the variable it stands for should be used as is.
Question 2. Are variables publicized as being available in a template are the same ones we can read in the parameter $vars passed to a preprocess function, right?
Riiight.
Question 3. Some of these variables we're using don't seem to be listed at the beginning of the file modules/node/node.tpl.php...
True. They are missing from the comment area, because they are less commonly used. That's why the Devel module is tremendously useful to themers in Drupal 6: as a themer, you can use the Themer info widget to get an exhaustive list of the available variables for any template.
Question 4. You say that the variable $last_edit is undefined if we're on a page with a list of nodes, or if the node wasn't edited after its creation. Why is that?
Because of this condition in the preprocess function:
if ($vars['page'] && $vars['created'] != $vars['changed']) {
We are defining the new variable only when we pass through this condition.
$vars['page'] becomes $page in the node template and it's a TRUE/FALSE flag. It is TRUE when the node is shown on its dedicated page at webSite.com/node/x, and FALSE otherwise. You could change this to say if we're not showing the node in teaser view, and in most cases this would have the same effect, but take note that it is possible to show a list of nodes in full view, with the module Views for example.
Changing $vars['page'] to !$vars['teaser'] — and changing the != sign to a 'greater than' sign — will give your script the same behavior in most situations:
if (!$vars['teaser'] && $vars['created'] < $vars['changed']) {
No time of day in node date
It is common to wish to remove the time of day shown in the node “submitted” line. In Drupal 5, there were no less than three ways to achieve this, and I will present these when I'm done covering date formatting for Drupal 6. Drupal 6 allows you to modify the different formats for dates in the Administration area of your site, these different formats being small, medium and large — yep, just like pizza, oh... my... god... You could do the same in Drupal 5. However, you then had to pick among a finite list of options. In Drupal 6, you can create an nth option, if you like none of the options presented to you.
It is the medium-size date format that's used to format the submitted line in nodes, as shown in lines 2449-2460 of modules/node/node.module:
/**
 * Format the "Submitted by username on date/time" for each node
 *
 * @ingroup themeable
 */
function theme_node_submitted($node) {
  return t('Submitted by !username on @datetime',
    array(
      '!username' => theme('username', $node),
      '@datetime' => format_date($node->created),
    ));
}
In Drupal 6, the signature of the Drupal function format_date() is:
format_date($timestamp, $type = 'medium', $format = '', $timezone = NULL, $langcode = NULL)
When the 2nd parameter is not set, 'medium' is used to format the date, and the function theme_node_submitted() is not setting that 2nd parameter when calling format_date().
To modify the medium-size format for dates, head over to the page admin/settings/date-time of your Drupal site. Under Formatting, in the drop-down list of options for “Medium date format:”, you will find a “Custom format” option. Select it. There was no such option in Drupal 5. Note that in Drupal 6 — just like in Drupal 5 — all the preset options still show time of day for the medium-size date.

Look for the preview of the current date in the text below the field on the right, where it says: This format is currently set to display as...
(Take note also that a link to the PHP manual is provided to you, to show you how to format dates in PHP.)

If all you want to do is remove the time of day from your current default, get rid of the - H:i part. Then do a Save configuration.
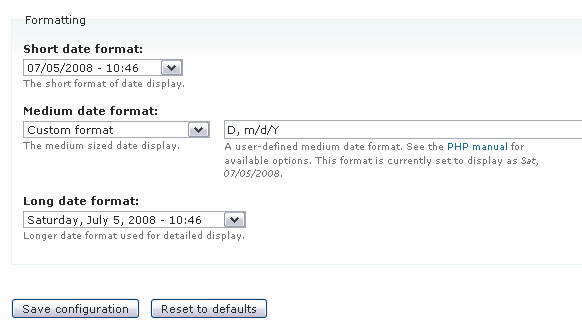
Now if you look at any node on your site, you will see that the change has taken effect immediately: no more time of day.

If you do not see the change, it can mean either of these two things: your theme is overriding the function theme_node_submitted(), or, the function format_date() is called within your node template file, in your theme, with some custom format, to display the date.
In Drupal 5
In Drupal 5, there were at least three ways of going about changing your date format.
Use template.php (http://drupal.org/node/209793#comment-697884) to modify the variable $submitted. Like so:
function _phptemplate_variables($hook, $vars) {
  switch($hook) {
    case 'node' :
      $vars['submitted'] = t('Submitted by !username on @date',
        array(
          '!username' => $vars['name'],
          '@date' => format_date($vars['node']->created,
                                  'custom', 'l, j M Y'),
        ));
      break;
  }
  return $vars;
}
Modify your site's settings.php file (http://drupal.org/node/134990#comment-221129) — to change your system's default medium format. Thank you, Mooffie. So you un-comment the $conf array and add one line to it, like so:
$conf = array(
#   'site_name' => 'My Drupal site',
#   'theme_default' => 'minnelli',
#   'anonymous' => 'Visitor',
    'date_format_medium' => 'D, m/d/Y',
);
Modify node.tpl.php (http://drupal.org/node/134990#comment-221973) — instead of printing $submitted, you print $node->created formatted. Like so, for example:
print format_date($node->created, 'custom', 'l, j M Y');
![[]](http://11heavens.com/files/php-med-trans.png)
