DIY Advanced Paper Shadow in Photoshop

The following Photoshop tutorial shows how to apply realistic drop shadows to photos. Once satisfied with your result, you can slice your image up and, using CSS rules, apply creative shadows, hence 3d effect, to any image, Drupal block, Drupal box, etc. Similar tutorials are all over the web — well, not exactly, but there are many. However, I had difficulty understanding the best of them. I clarified the whole process for myself, and have decided to dump it here. Lovely photo. Attached is my Photoshop CS2 file.
Here is my tutorial, scanned from an Hilroy loose-leaf.
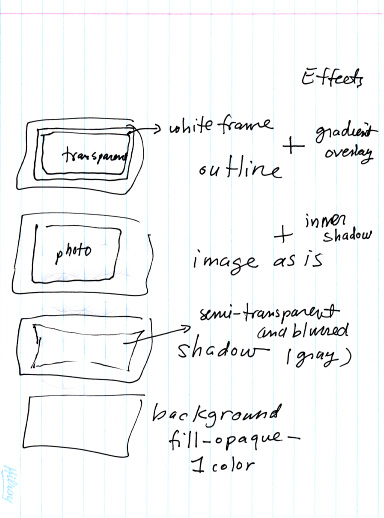
Just kidding! Although this image sums it up really well, you may not be able to read it. You'll end up with four layers (as shown on the scan), with 'effects' applied to the two top layers.
Let's go through the process step by step.
-
Create a new document in Photoshop. Any 'ol version of Photoshop will do. You'll either create your new document as transparent or pre-fill it with some color. Does not matter. However, you might want to create it right off in larger proportions than your photo's. To give you some room. Of course, you can fix it all later using Image → Canvas Size (ALT-CTRL-C in Windows). Me, I created a 800 by 600 pixels document with 72 ppi, pre-filled with white.
-
Go head and open your photo in Photoshop. Then place your photo in your Untitled document. Know how? Select the layer where your photo is — that layer is probably locked, that's fine, then drag it and drop it onto the window of your Untitled document. This will effectively add a new layer to your Untitled document, on which your photo will reside. Now I realize, doin' it on my end, that my photo is not in 72 ppi, so it is way too big. So I delete my new layer, and resize my photo first (in its own document) using Image → Image Size (ALT-CTRL-I in Windows) and setting the Resolution to 72 ppi. Then I reselect the layer and drag & drop it onto my other document. Done.
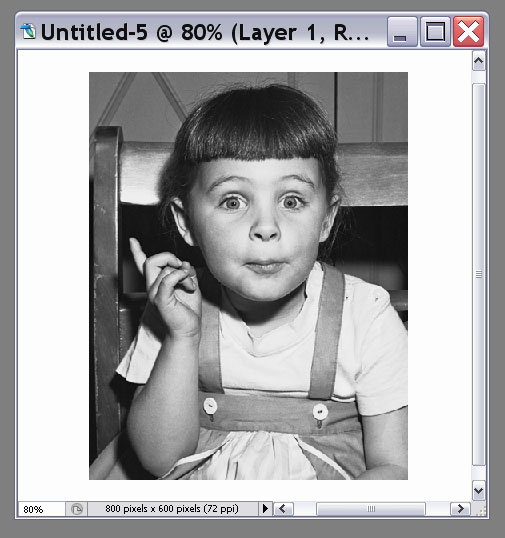
I now have 2 layers. I rename my bottom layer to 'background' and my top layer to 'photo'.

-
Now comes the fun part, in which we'll create the shadow. This shadow will reside on its own layer, and we will *not* use any effect to create it. Go ahead and create a new layer (SHIFT-CTRL-N in Windows), and name that layer 'shadow'.
Here is our next goal: create a selection that we will fill with black-ness, and we'll start by shaping this selection after our photo's outline. So, go and select the 'photo' layer. Then, go to Select → Load Selection. In the 'Load Selection' dialog that'll pop up, select 'photo Transparency' as 'Channel'. Click OK. You now have a blinking selection surrounding your photo.
The next goal is to create a path out of this selection. We want to change the shape of our selection. Once we're happy with the shape, we'll turn in into a selection again and fill it with black-ness. So, how do we do it? Press 'M' to use the Marquee tool. Place your cursor over your image, right click, and from the context menu select 'Make Work Path...' (with Tolerance set to 2.0 pixels). You've now created a path out of your selection.

To distort the path, we'll use these tools: the Direct Selection Tool and the Convert Point Tool. Press 'A' to grab the Direct Selection Tool. Select the top left point of your path. You might have to click twice. You'll know that your point is selected when its little square has turned gray — as opposed to the other 3 points along the path. Move that point away from the photo. Use the Convert Point Tool (from your Tools box, just below) to change that 90-degrees corner to one with handlebars. Play with the handlebars using the Direct Selection Tool. To break the connection between the 2 handlebars of a point, you have to select one of the 2 handlebars with the Convert Point Tool. (And there is another way to achieve this, but I forget...) Repeat the procedure for the other 3 points. At the end, you'll end up with something like this:
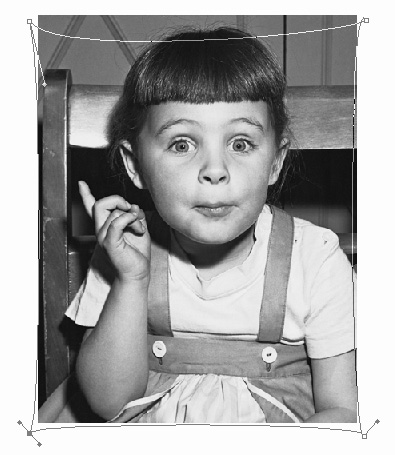
Notice on the last screen capture that the bottom left point is selected: it is gray.
Important: make sure that there is 1 or many sides to your photo where the shadow is hidden, not showing *at all*. Why? Because if you don't do that — and there is a shadow showing all around your image — your photo will look as if it is floating on the page. That ain't too realistic.
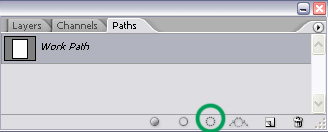
Now we will turn this path into a selection again. Access the 'Paths' panel, and click on the selection icon, shown here:
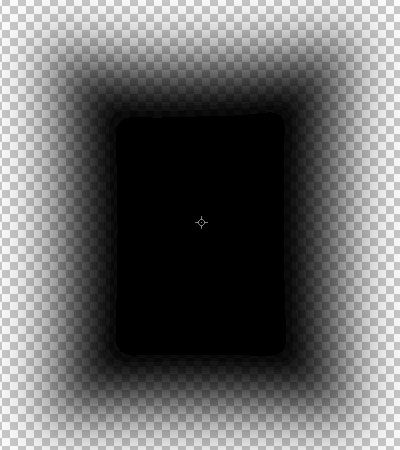
We will now fill our selection with black-ness. Make sure that your 'shadow' layer is selected. Then go to Edit → Fill. Select 'Black' from the drop-down. Then deselect all (CTRL-D). Set the Opacity of your 'shadow' layer to ~50%, right now or later. Then, apply a Gaussian blur to your layer. Make sure that when you apply this filter your shadow is no longer selected, because if it's still selected your filter will only apply to your selection, and we want to apply the 'blur' to the entire layer. You'll end up with a layer that looks like this, when others layers are hidden from view:
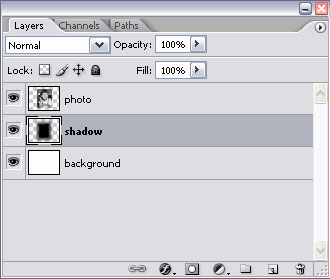
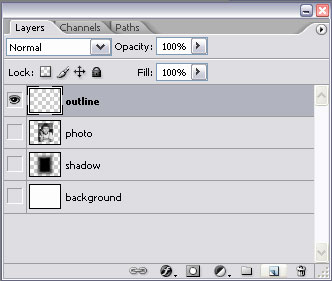
We now have 3 layers. Reorder your layers so that the shadow is under the photo.
-
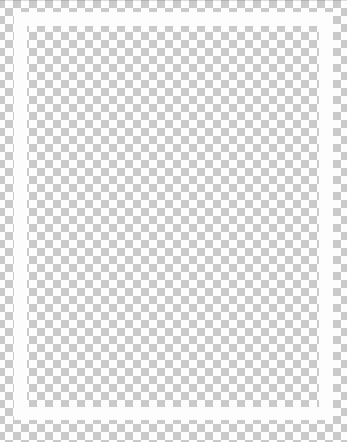
We will now create our white border. This part is easy. Create a new layer (SHIFT-CTRL-N in Windows), and name that layer 'outline'. We need to create a selection based on the photo outline. We did this before in step 2, but we hadn't saved our selection. Go ahead and select the 'photo' layer. Then, go to Select → Load Selection. In the 'Load Selection' dialog that'll pop up, select 'photo Transparency' as 'Channel'. Click OK. You now have a blinking selection surrounding your photo. Press 'M' to revert to the Marquee tool. Then press the ALT key. Do not move your finger from that key. Placing your cursor above your current selection, you'll see that your cursor has turned into a plus sign with a smaller minus sign next to it. What that means? It means we'll subtract from our current selection. Draw a rectangle selection within your current selection. You're creating a selection in the shape of a border. In the process of creating your border, you'll hide part of your photo, you will effectively crop it. (I wish I'd told you this before, please do not slap me.) Once done, select your 'outline' layer, then go to Edit → Fill, and select White as your fill. Then deselect all (CTRL-D). You have a white outline, border, whatever, on your 'outline' layer.
We now have 4 layers, like so:
Time to add 2 Photoshop effects
-
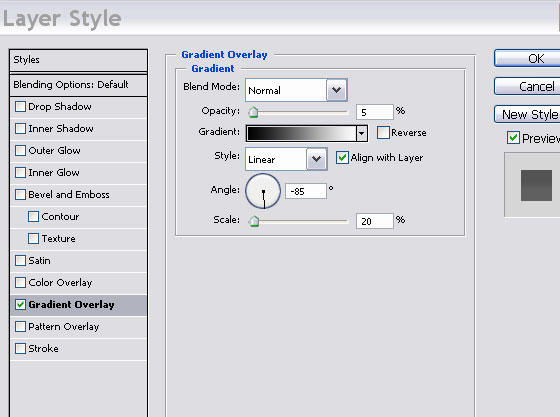
We'll apply a gray-to-white gradient on the white border. Right-click on the 'outline' layer, in your Layers palette, and choose 'Blending Options...' from the context menu. Check 'Gradient Overlay' in the list on the left in the dialog box. Double-click on 'Gradient Overlay' to access the gradient properties. Make sure you play with the Angle. Look at the preview. Decide for yourself where the Light is coming from.
-
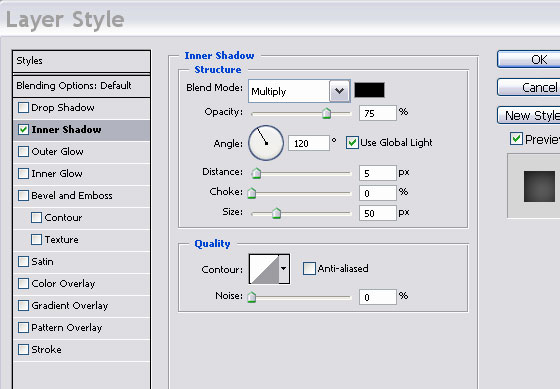
A final touch will consist in applying some light effect on the photo itself. This step is useless if you slice up the resulting image for use in CSS-styling. Right-click on the 'photo' layer, in your Layers palette, and choose 'Blending Options...' from the context menu. Check 'Inner Shadow' in the list on the left in the dialog box. Double-click on 'Inner Shadow' to access the shadow properties. Make sure you play with the Angle here as well. Look at the preview. Decide for yourself where the Light is falling.
Time to slice up the image for CSS-styling
And time to have supper.